
ASCII Image and Video Renderer
I recently made a project with Python that converts images and videos into ASCII art directly in your terminal. So I decided to write about it; I’ll explain what ASCII art is, how images work, and walk you through my code step by step.
What is ASCII Art?
ASCII art is a design technique that uses characters from the ASCII (American Standard Code for Information Interchange) set to create images. In simpler terms, it transforms pictures into a collection of letters, numbers, and symbols. This art form became popular when computers had limited graphic capabilities, and people used text to create pictures.
For example, an image of a cat might look something like this in ASCII art:
 /\_/\
( o.o )
 > ^ <
How Do Images Work?
Images are made up of tiny dots called pixels. Each pixel has a specific color, and together, these pixels create the overall image you see on the screen. When we convert images to ASCII art, we replace each pixel with a character that represents its brightness level. Darker pixels might be represented by characters like #, while lighter pixels could be represented by characters like . or (space).
Building the ASCII Art Converter
Setting Up the Project
First, lets import the necessary libraries:
import os
import sys
import time
from PIL import Image
import cv2
from blessed import Terminal
from colorama import init

term = Terminal()
init()
- PIL (Pillow): A library for opening, manipulating, and saving image files.
- cv2 (OpenCV): A library for working with video files.
- blessed and colorama: Libraries that help with handling terminal display and colors.
Defining Constants
Next, lets define some constants that would be used throughout the code:
DEFAULT_CHARSET = "@#$%&*()0!=-.,"
DEFAULT_COLOR = False
IMG_SIZE = (0, 0)
imgs = []
- DEFAULT_CHARSET: This is the set of characters that would be used to represent the different brightness levels in the ASCII art.
- DEFAULT_COLOR: A flag to determine whether to use color in the ASCII art.
- IMG_SIZE: This will hold the size of the terminal, which we’ll set later.
Getting the Terminal Size
We need to know the size of the terminal to ensure the ASCII art fits nicely. Here’s the function we’ll use to get the terminal size:
def get_terminal_size():
    return os.get_terminal_size()
Converting Pixels to ASCII Characters
This part of the code converts a pixel’s color value into a character from the DEFAULT_CHARSET based on its brightness:
def pix_to_code(i, img):
    x = i % IMG_SIZE[0]
    y = i // IMG_SIZE[0]
    code = img.getpixel((x, y))
    return f"\033[38;2;{code[0]};{code[1]};{code[2]}m"
The pix_to_code function converts a pixel at index i in an image img to an ANSI escape code that changes the terminal's text color to match the pixel's RGB color. It calculates the pixel's (x, y) position in the image, retrieves its color using getpixel, and formats it into a string that sets the terminal's foreground color using the RGB values.
Printing the Image as ASCII Art
Now to the main function for printing the ASCII art; print_img, where we resize the image and convert it to ASCII:
def print_img(image, is_colored):
    img = image.resize(IMG_SIZE, Image.Resampling.LANCZOS)
    gimg = img.convert('L')
    img = img.quantize(colors=32).convert('RGB')
    pixels = list(gimg.getdata())

    output_string = ""
    last_color = None

    for i, pixel in enumerate(pixels):
        if i % IMG_SIZE[0] == 0 and i != 0:
            output_string += "\n"

        ind = int(pixel / 255 * (len(DEFAULT_CHARSET) - 1))
        char = DEFAULT_CHARSET[ind]

        if is_colored:
            color = pix_to_code(i, img)
            if color != last_color:
                output_string += "\033[0;39m" + color + char
                last_color = color
            else:
                output_string += char
        else:
            output_string += char

    with term.hidden_cursor():
        sys.stdout.write(term.home + output_string)
        sys.stdout.flush()
It starts by resizing the input image to a fixed size. Then, it creates a grayscale version of the image, which is used to map pixel brightness to ASCII characters. The original image is also quantized to 32 colors and converted back to RGB format to ensure consistency when generating color output.
For each pixel in the grayscale image, the pixel brightness is scaled to a character from the predefined character set (DEFAULT_CHARSET), where darker pixels are mapped to denser characters, and lighter pixels to lighter ones. The function then checks if the color mode is enabled (is_colored). If true, it retrieves the RGB color of the corresponding pixel from the quantized image using the pix_to_code function, which returns an ANSI escape code for the RGB values. To avoid redundant color codes, the function only applies the color change when the pixel color differs from the previous one. If the color changes, it resets the text color before applying the new one.
As the function processes the image, it constructs an output string by appending characters, row by row, corresponding to each pixel. Line breaks are inserted to maintain the aspect ratio of the image. Finally, the constructed ASCII art is printed directly to the terminal.
Handling Images and Videos
The project can handle both images and videos. Here’s how image files are opened:
def open_image(file):
    try:
        return Image.open(file)
    except Exception as e:
        print(f"Error: Unable to open image file {file}. {e}")
        return None
For videos, it opens a video file, reads its frames, converts each frame from BGR to RGB, transforms them into Pillow image objects, and stores them in a list.
def open_video(file):
    vid = cv2.VideoCapture(file)
    if not vid.isOpened():
        print(f"Error: Unable to open video file {file}.")
        return

    while True:
        ret, img = vid.read()
        if not ret:
            break
        conv = cv2.cvtColor(img, cv2.COLOR_BGR2RGB)
        imgs.append(Image.fromarray(conv))

    vid.release()
Main Function
The main function ties everything together. It checks for file input, processes images or videos accordingly, allows for color and character set customization via command-line arguments, and displays the result at a 30fps-like rate for videos.
def main():
    global IMG_SIZE, DEFAULT_COLOR, DEFAULT_CHARSET

    IMG_SIZE = get_terminal_size()
    if len(sys.argv) < 2:
        print("No file provided. Please provide an image or video file as an argument.")
        return

    file_path = sys.argv[1]

    if file_path.split('.')[-1] in ["mp4", "avi", "mov", "gif"]:
        open_video(file_path)
    else:
        img = open_image(file_path)
        if img:
            imgs.append(img)

    for arg in sys.argv[2:]:
        match arg:
            case "-c":
                DEFAULT_COLOR = True
            case "-f":
                DEFAULT_CHARSET = "$@B%8&WM#*oahkbdpqwmZO0QLCJUYXzcvunxrjft/\\|()1{}[]?-_+~<>i!lI;:,^`'."

    for img in imgs:
        print_img(img, DEFAULT_COLOR)
        time.sleep(0.033)  # Approx. 30fps

    print("\033[0;39m")

if __name__ == "__main__":
    main()
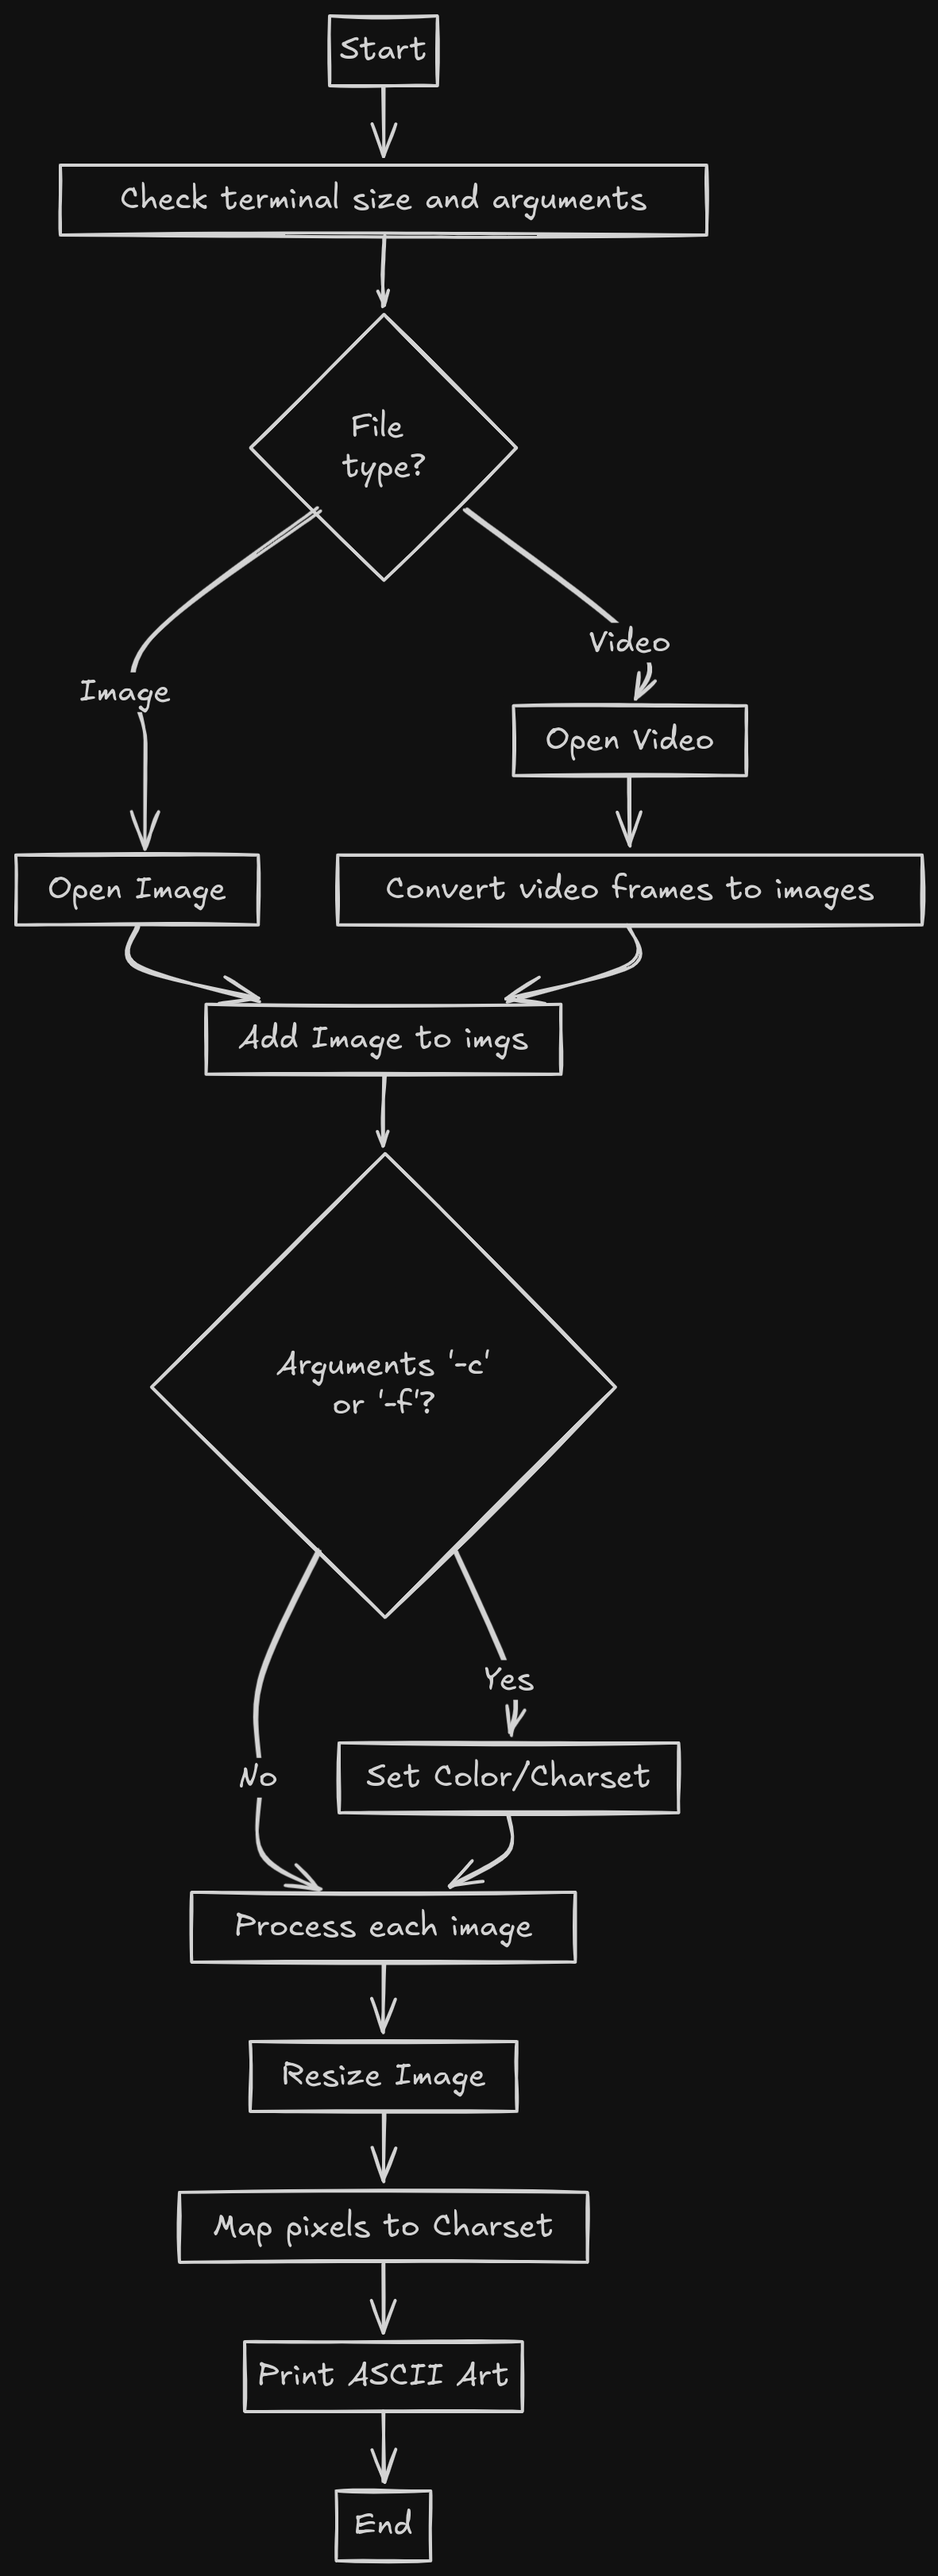
Flow of the Main Function
To give you a clearer understanding of the control flow in this script, here’s a visual representation using a flowchart:
Example Usage
To run the script, you need to provide the image or video file as an argument in the terminal. Here’s an example command:
python ascii_art_converter.py your_image.png -c
This command will convert your_image.png into ASCII art and display it in color.
Visual Example
Here is an example of the output you can expect from the program:
Original Image: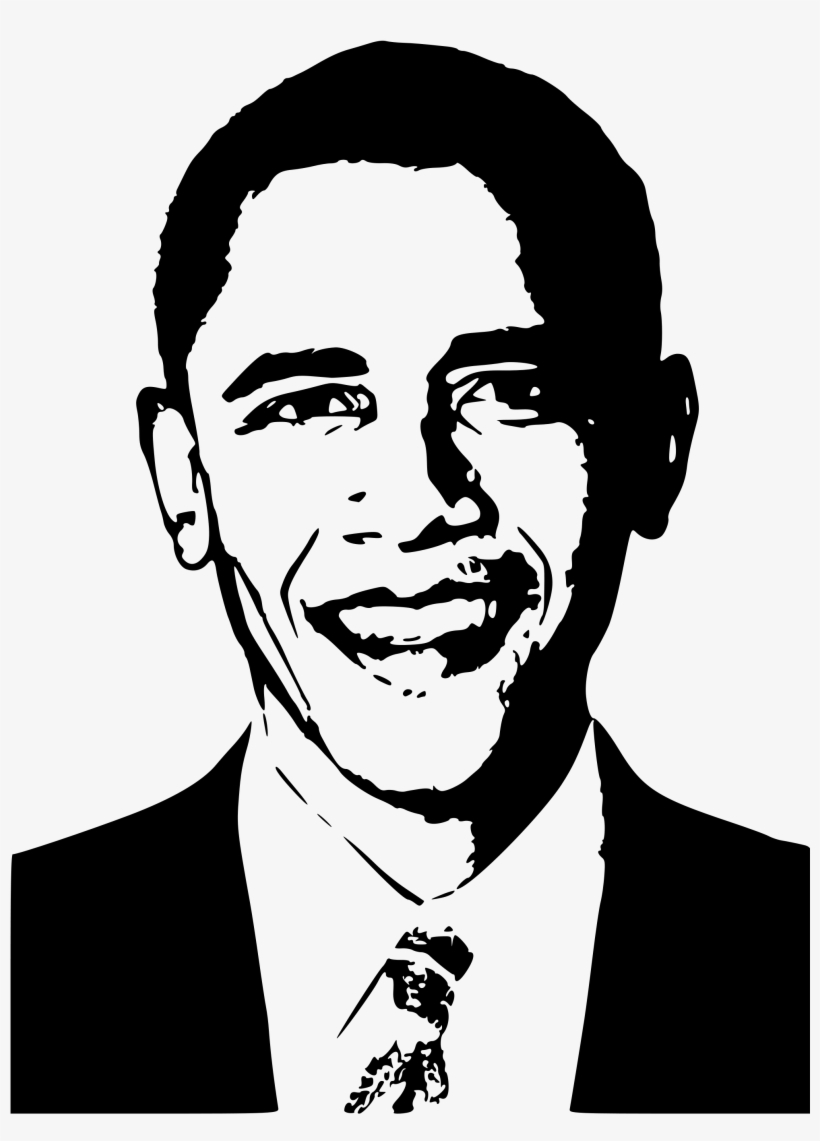
ASCII Art Representation: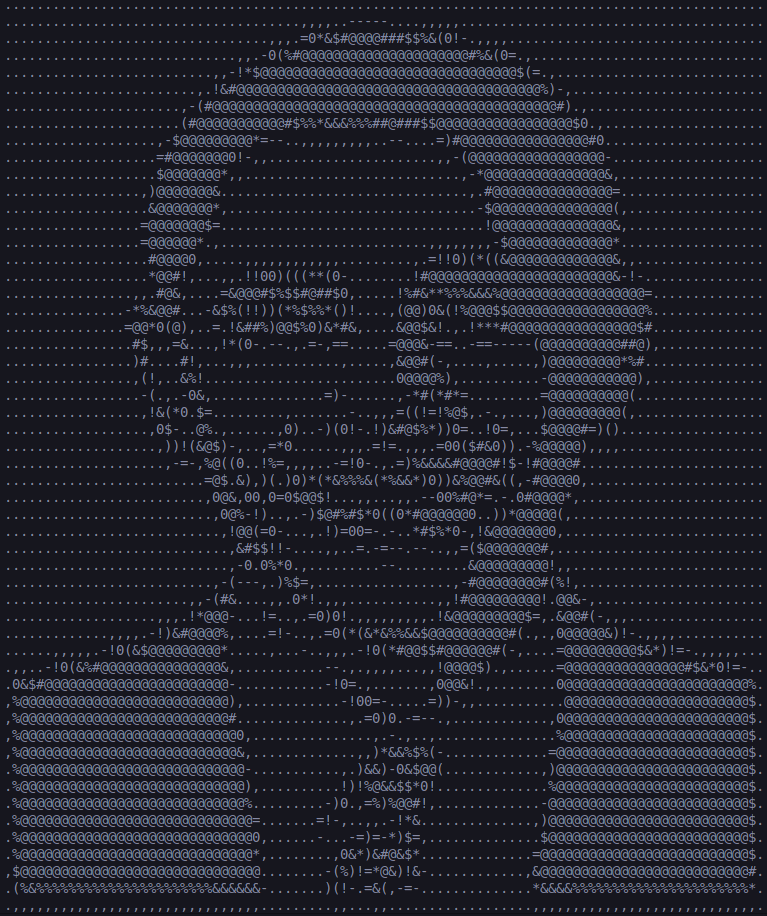
Conclusion
Creating this project was a fun way to explore programming. It allowed me to practice my Python skills while learning about image and video processing. I hope this blog post inspires you to try and recreate yours, or explore similar projects!
Feel free to check out my code on GitHub and try it out for yourself!